Roguelike defense game guide
Grow Guerrilla Beginner's Guide: How to Survive Your First Seasons
New to Grow Guerrilla? Learn how a 12-stage season works, how gun heat and jams really behave, what to shoot first and where to spend your first Gold Bud.
Grow Guerrilla looks simple: one farmer on the roof of an old bus, three plants in front of it, and a sky full of Babylon's air force. Hold your thumb on the screen and the gun fires toward it. But your first few seasons usually end the same way — a jammed gun, a paratrooper you didn't see, and a crop that's suddenly gone.
This guide covers what we wish every new farmer knew on day one: how a season is structured, how gun heat actually works under the hood, which enemies to shoot first, and how to turn a lost run into permanent progress. We build the game, so the numbers below come straight from it.
How a season works
A run is called a season. On the default strains it has 12 stages, and the shape is always the same, even though enemies and weather are randomized from the run's seed:
| Stage | What happens |
|---|---|
| 1–3 | Intro waves: scout choppers, gunships and paratrooper transports. Crossing planes (bombers, crop dusters, drones, jets) join from stage 3. |
| 4 | Elite wave — a tougher unit with 2.1× health. Clear the stage for a guaranteed relic. |
| 5–7 | Heavy support units appear: blimps, gas vans, riot vans, gliders, napalm jets. |
| 8 | Second guaranteed elite wave and relic. |
| 9–11 | Exotic units arrive: UFO scouts and cloaking saucers. |
| 12 | The season boss. Beat it to win the season (and a relic). |
After every cleared stage, Jah offers a draft: pick one of three skills. After stages 3, 6, 9 and 11 you also visit Jah's Shop, where buds buy extra skills, relics, plant heals and replants. Our builds and synergies guide covers drafting in depth.
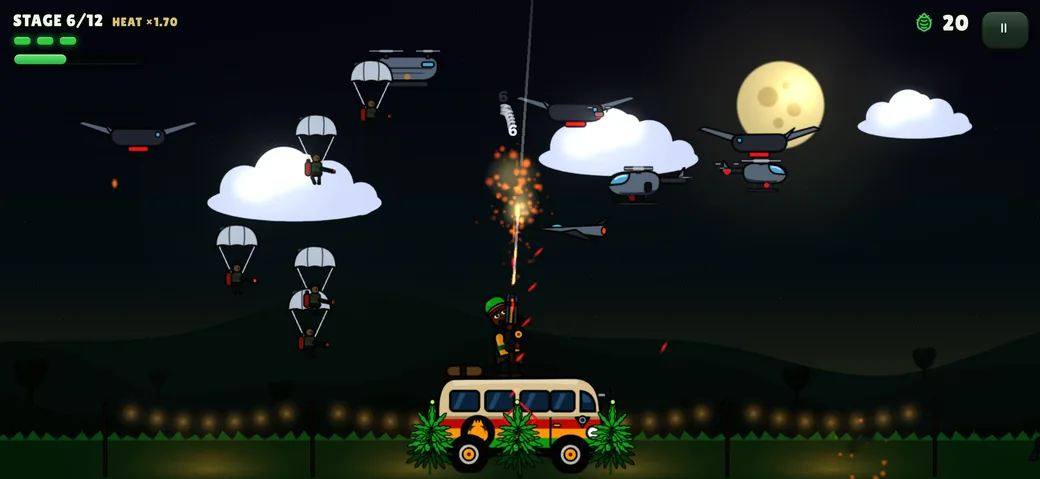
The HEAT × number next to the stage counter is the stage's difficulty, not your gun temperature. It multiplies enemy health and starts at ×1.00, climbing by 0.14 per stage to ×2.54 at the boss in Chapter 1. Later chapters multiply it further.
Gun heat and jams, explained
Every shot adds heat to the gauge. When it fills, the gun jams: it locks for 1.6 seconds, and the shot that tipped it over is lost. That lockout is what kills runs — not because 1.6 seconds is long, but because it tends to land just as a paratrooper is about to touch down.
Three rules explain almost everything about heat:
- Cooling only starts after a short pause. The gun begins cooling about 0.18 seconds after your last shot, then sheds roughly a third of the bar per second. Tiny flicks of your thumb don't cool anything; letting go for one second clears about 28% of the bar, two seconds about 62%.
- Slow guns cool between their own shots. Because each shot of a slow, heavy weapon is followed by a long gap, guns like the Seed Mortar or Sativa Sniper barely build heat on their base stats. Fast guns don't get that gap: with no upgrades, a Babylon Shredder jams after about 3 seconds of held fire, Dual Uzis after about 2, while the starter AA Machine Gun lasts around 9.
- A jam isn't a disaster on its own. During the lockout the gauge drains quickly, so when the gun unjams it's nearly cold — that's a faster reset than letting go and waiting for normal cooling. The real cost is when it happens.
The habit to build: vent during lulls, not during danger. When the sky is briefly clear, lift your thumb for a second or two so you go into the next wave with an empty gauge. If you're nearly full and nothing urgent is on screen, it's fine to keep firing into a jam.
Fire-rate bonuses change this picture. Every point of fire rate shrinks the gap between shots, so a slow gun that never jammed at base can start jamming once you stack Rapid Fire or play Sativa Haze. Heat-capacity and cooling skills (Cooling Fins, Quick Vent) and relics like One Love push back.
Keeping your plants alive
You start with three plants at 100 HP each. The season ends the instant the last plant is destroyed, so losing one or two is survivable — but every lost plant also shrinks your margin for the rest of the run.
- Plants heal between stages: 25 HP after stage 1, growing by 6 per stage (85 HP after stage 11). The Dry Season weather modifier cancels that heal for one stage.
- Destroyed plants stay dead unless you buy a Re-Plant in Jah's Shop (half HP), draft Rewind (an active skill that brings back the last plant you lost), or have Deep Roots or the Second Wind relic.
- The field holds up to five plants. The Sensimilla Seeds relic grows one on the spot, and the Extra Plot perk adds starting plants later on.
- Tarp Shield is a skill worth knowing early: hold its button to raise a canopy that blocks air attacks, including targeted strikes and UFO abduction beams. It drains in about three seconds and recharges in about six, so raise it for specific threats rather than holding it.
If the crop does go down, you may be offered a once-per-run revive that replants everything at full strength and clears the sky (it's an optional rewarded ad, and never available in Daily Challenges).
What to shoot first
Most enemies chip at your plants. A few end runs. Learn these and prioritize them over whatever is closest:
- Recon Drones. Small, fast and erratic. If one reaches a plant it tags it, and an air strike lands about three seconds later for heavy damage. Kill it before it tags; once the target marker is down, only the tarp or a shield will save that plant.
- Paratroopers. Each one that lands torches or uproots a plant. You can shoot the canopy or the lines: a chute cut high up means the trooper falls to his doom (no buds, but no damage either). Elite Troopers dropped by gliders hit even harder.
- UFO Scouts. From stage 9 in Chapter 1 (earlier in later chapters) they zig-zag in and hover over a plant with a beam. If the beam completes, the plant is gone outright. Staggering the UFO or raising the tarp breaks the beam.
- Surveillance Blimps. Slow and tanky, but while one is alive your enemy health bars are jammed, enemy fire hits 20% harder, and it periodically calls a satellite strike that wipes out anything in a column — plants included. Burn it down.
- Tear-gas canisters. Lobbed by gas vans; shoot them mid-arc and they never land.
Two smaller tells help too: an A-10 Strafer is announced by a red warning arrow at the screen edge just before its run, and a Chem Tanker splits into two crop dusters when it dies, so don't relax the moment it pops.
Stage modifiers (weather)
From the middle of a season onward, every stage rolls at least one modifier, and the final stretch can stack two or three. They're shown on the stage intro, so read them before you start firing.
| Modifier | Effect | How to play it |
|---|---|---|
| Crosswind | Projectiles curve sideways | Lead your shots; homing and splash help |
| Downpour | Gun cools faster, paratroopers fall faster | Fire freely, but watch the chutes |
| Heat Wave | Enemies move 20% faster | Start each wave with a cold gun |
| Full Moon Munchies | +50% buds, enemies +15% HP | A good stage to bank buds for the shop |
| Night Raid | Darkness; spec-ops gliders sneak in | Watch for gliders dropping elite troopers |
| High Alert | One extra guaranteed elite | Save actives for the elite |
| Dry Season | Plants don't heal after this stage | Play defensively; a shop heal is worth more |
| Chemtrails | Defoliant clouds drift across | Thin out enemies before the cloud arrives |
| Blackout | No enemy health bars | Focus fire on one target at a time |
| Searchlights | Sweeping beams call reinforcements | Shoot the two lights out early; they're fragile |
| Meteor Shower | Occasional falling debris | Mostly cosmetic; the debris can hit plants |
Buds vs. Gold Bud
Grow Guerrilla has two currencies, and mixing them up is the most common beginner mistake.
- Buds drop from enemies during a run (and float to your counter on their own once they fall low enough). They pay for draft rerolls (12 buds) and everything in Jah's Shop. They're gone when the run ends.
- Gold Bud is the permanent currency you spend in the Grow House. Every run pays some, win or lose.
Your Gold Bud payout comes from your run score (kills, stages cleared, best combo and buds collected), plus one Gold Bud for every five buds you didn't spend, plus a 60 Gold Bud bonus for winning. As a worked example, a won Chapter 1 season with 260 kills, an 18-kill best combo and 1,400 buds collected pays about 162 Gold Bud. Roughly 305 of those buds come from the boss's own drop, which lands at the very end and is still unspent, so it converts to about 61 Gold Bud; add the 60 win bonus and the boss kill accounts for three-quarters of the payout. A loss at stage 7 with a similar pace pays around 19.
Takeaway: spend buds on whatever keeps the crop alive. Hoarding buds mid-run is worth very little next to reaching and beating the boss, and later chapters multiply the whole payout (×1.5 in Dust Valley up to ×3.5 in Zion Heights).
Your first Grow House upgrades
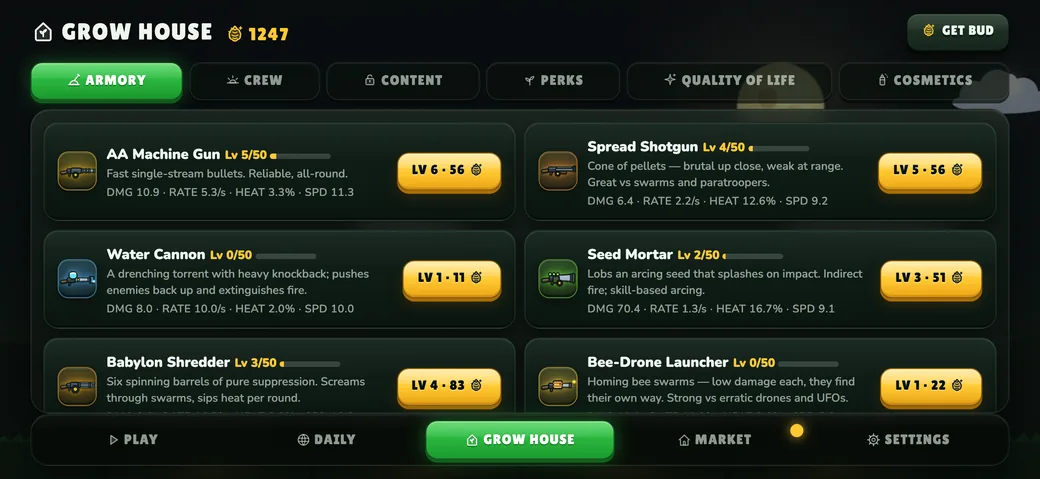
The Grow House has six tabs: Armory, Crew, Content, Perks, Quality of Life and Cosmetics. Most tracks are gated by your Farmer Level (it rises with XP from every run, and each level-up pays Gold Bud and refills your fuel). Here's where we'd put the first few hundred Gold Bud:
- Armory levels on your main gun. Each level adds about 1.8% damage and 1% fire rate and trims heat per shot. The first levels are cheap, and they count in every mode.
- The Level 1 perk tracks. Stronger Strains (damage), Rich Soil (plant HP), Big Radiator (heat capacity), Fat Harvest (buds) and Seed Money (starting buds) open immediately. Spread a few levels across damage, plant HP and heat first.
- A second strain and a second gun. Indica Kush unlocks at Farmer Level 2, as does the Spread Shotgun; the Water Cannon follows at Level 3. Variety matters because each run you choose one strain and one gun on the loadout screen. Our strains guide explains which to pick.
Fuel, missions and chapters
Starting a normal season burns one can of bus fuel. The tank holds five cans and refills one every 15 minutes, even while the game is closed. Daily Challenges never use fuel, so they're the perfect thing to play when the tank is dry.
Open Missions from the loadout header for three daily objectives and three weekly ones. Progress comes from normal play, but rewards must be claimed by hand — clearing all three dailies also pays a bonus that grows with your daily streak. The stash next to it fills with Gold Bud while you're away, for up to eight hours.
Finally, chapters: there are five, from The Homestead to Zion Heights. Beating a chapter's season boss unlocks the next one, which pays more Gold Bud but brings much tougher enemies and heavier units earlier in the season. If a new chapter feels like a wall, go back and farm the previous one while you upgrade — that loop is how the game is designed to be played. When you reach stage 12, our bosses guide has a plan for each of the five.
Frequently asked questions
Do I have to keep my thumb on the screen?
By default, yes: the gun fires while you touch the screen and aims toward your thumb. Settings has an Always Firing accessibility option that fires without holding, and an Aim Line that shows where the gun points. Remember that always firing also means always heating.
Why did my plant die when nothing was shooting at it?
Usually a tag. A Recon Drone or a blimp's satellite strike marks a plant first and the hit lands a few seconds later, after the attacker may have left. Fire and gas also keep ticking after the attacker dies.
What happens if I close the app mid-run?
The game saves a checkpoint at each stage intro, draft and shop, so next time you open it you can resume from that point or abandon the run.
Is Grow Guerrilla free to play?
Yes. Ads are optional rewarded videos, and purchases are optional. You can read more on the Grow Guerrilla page.